Show Related CategoriesCategory
Filter By Tile Design
Tile Appearance
Filter By Colour
Filter By Material
Ceramic
Engineered
Natural Stone
More Materials
Filter By Shape
Filter By Price Per Item
Filter By Dimensions
Popular Sizes
Thickness
Length
Width
Filter By Tile Finish Type
Shine Level
Glaze Type
Special Finishes
Filter By Availability
Filter By Tile Type
Filter By Customer Rating
Filter By Mosaic Pattern
Backsplash Tile
11,837 Items

+11
17 Colors
Amara 8" x 8" Encaustic Look Matte Porcelain Floor & Wall Tile
By MSI
Azila
Rated 4.8 out of 5 stars.1736 total votes
Get it by Fri, Jul 11
- Tile Type :
- Singular Tile
- Country of Origin :
- Turkey
- Overall Shape :
- Varied
This porcelain floor and wall tile brings a touch of Spanish and Moroccan flair to your home with its intricate design. Each tile is glazed for a sleek finish, making it a versatile choice for both floors and walls. With its impervious water absorption rating, this tile is waterproof, making it ideal for kitchens, bathrooms, or outdoor spaces that withstand sun and rain. The tiles feature a slight shade variation, adding depth and interest to your space. Each carton includes 12 tiles, ready to transform your room with their elegant pattern. For best results, we recommend a 1/8 inch grout joint size.
Really pretty when the light reflects off of it. Rachel. Brooklyn, NY. Thu May 15 2025
+2
8 Colors
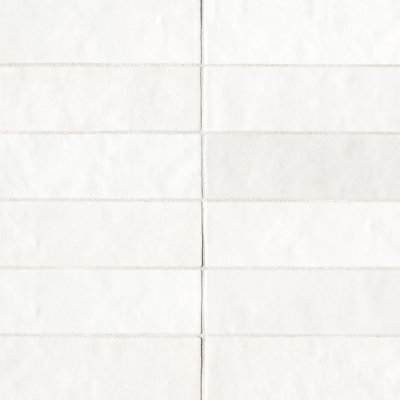
Karma 3 in. x 8 in. Glazed Ceramic Subway Wall Tile (38 pieces 5.38 Sq. Ft. / Case)
By Bond Tile
White
Rated 4.5 out of 5 stars.308 total votes
- Tile Type :
- Subway Tile
- Country of Origin :
- Spain
- Overall Shape :
- Rectangle
This ceramic subway tile brings a touch of Spanish and Moroccan flair to your indoor spaces with its substantial shade variation. Each rectangular piece is glazed with a semi-gloss finish, adding a subtle shine to your kitchen backsplash or bathroom walls. With its pressed, straight edges, this tile offers a clean and seamless look. While it's water-resistant and submersible, sealing is required to maintain its appearance. The tiles are chemical-resistant, making them a practical choice for busy areas. With 38 pieces per carton, you'll have plenty to cover your space. We recommend a 1/16-inch grout joint for best results.
The tile is absolutely gorgeous! The color White is very true to the picture with the shades of white in a tanneutral beige color with a beautiful soft texture on the glaze and subtle differences in thicknesses. However, make sure to order enough tile and an extra box just in case. We ended up being 24 tiles short and had to order another box. What we did not realize was the spare box of tile was a completely different manufacturer. Still the same size, pattern of glazing……but the colors are slightly different. We were able to mix the last of our first boxes into the tile surround to hide the color differences. That is the only reason we are leaving 4 stars instead of 5. ORDER AN EXTRA BOX JUST IN CASE!!. Alicia. Fort Thomas, KY. Thu Mar 06 2025

6 Colors
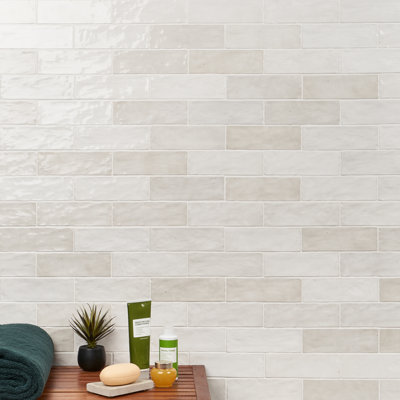
Renzo 2.5" x 13" Glossy Ceramic Picket Wall Tile
By MSI
White
Rated 4.7 out of 5 stars.165 total votes
Get it by Fri, Jul 11
- Tile Type :
- Singular Tile
- Country of Origin :
- Spain
- Overall Shape :
- Hexagon
MSI's Renzo 2.5" x 13" Glossy Ceramic Picket Wall Tile combines rich colour variation and subtle textured edges to create a unique handcrafted look in a 2.5" x 13" ceramic wall tile. Tranquil hues and a glossy finish will bring an updated look to kitchen backsplashes, bathroom walls, and other accent areas throughout your home. Low-maintenance, durable, and easy to clean, Renzo adds striking sophistication to residential and commercial projects.
Love! Love! Love! I’ve gotten so many compliments! Guys have even complimented it, you know that means it’s good! Tile is very unique with different shades and texture. My pictures make it look grey, but this is the green tile.. Gina. Berryton, KS. Sun Jun 29 2025
+24
30 Colors
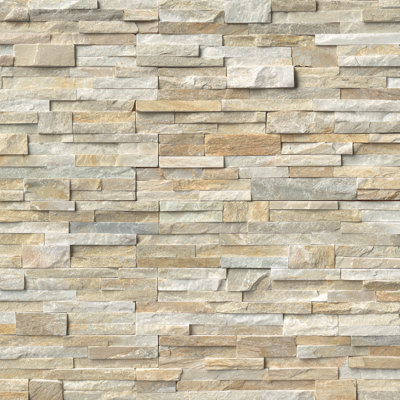
6" x 24" Stacked Natural Stone Ledger Panel Wall Tile
By MSI
Golden Honey
Rated 4.5 out of 5 stars.658 total votes
Get it by Fri, Jul 11
- Tile Type :
- Stacked Stone
- Country of Origin :
- Turkey
- Overall Shape :
- Varied
Allow your space to stand out with the natural stacked stone split face panels. This aesthetically pleasing 3D natural ledger stone tile is layered and textured with a ravishing coat that allows a variety of environments to shine. Its strips of stone are glued together for easy installation. It can be laid in a pattern or single layout and is suitable for residential and commercial installations. Note: Natural stone products are subject to variation in colour, shade, finish, etc. It’s recommended to blend tiles from different boxes when installing. Natural stones are characterized by dry seams and pits that are often filled. The filling may deplete over time, so refills may be part of standard maintenance. All natural stone products should be sealed with a penetrating sealer.
I couldn’t find this any where, and I found it here now I can finally finish my project. Barbara. Laurelton, NY. Sun Mar 30 2025
+2
8 Colors
Cloe 2.5 in. x 8 in. Handmade-Look Ceramic Wall Glossy Subway Tile
By Bedrosians
White
Rated 4.8 out of 5 stars.827 total votes
- Tile Type :
- Subway Tile
- Country of Origin :
- Spain
- Overall Shape :
- Rectangle
The Cloe collection is glazed ceramic wall tile characterized by its brilliant colours, smooth gloss finish, and interesting variations in hues and tones. Sizes 2.5” x 8”, allow for modern and classic looks. Trim out your projects with the mitre edge trim in a gloss finish. Disclaimer: Please note that this tile may exhibit natural shade variations, which may not be visible before installation but may become more apparent once installed. These variations are part of the product's unique characteristics and are not considered defects.
love the tile! grout is mapei eggshell. Oleg. Melissa, TX. Sun Jun 01 2025

+1
7 Colors
Urbano Glossy 4" x 12" Ceramic Subway Wall Tile
By MSI
Urbano Pure
Rated 4.5 out of 5 stars.251 total votes
Get it by Fri, Jul 11
- Tile Type :
- Singular Tile
- Country of Origin :
- Portugal
- Overall Shape :
- Rectangle
The Urbano Collection makes a style statement in a palette of cool and calming muted hues, like subtle creams, greys, and concrete looks to a striking black. These 4 in. x 12 in. glossy wall tiles have an authentic hand-crafted look and feel that give your kitchen, bath, living room, or other interior space a touch of contemporary detail. Whether installed horizontally, vertically, or in a herringbone pattern for a touch of the unexpected, this backsplash tile gives your walls, backsplash, shower surrounds, and fireplace facades a fresh updated look. Durable, easy to clean, and low maintenance, this ceramic subway tile is suitable for residential and commercial spaces.
Couldn’t be happier with this tile. A larger subway tile. Off white looks nice.. Vicky. NY. Sat Jun 14 2025
Backsplash Tile
Undergoing a kitchen makeover any time around – whether it be your first or fifth time – comes with a slew of new learning experiences. From knowing which products to pick out you'll be aesthetically happy with to ones that will function well, there are a lot of decisions to make, all while keeping up with the installation deadlines. Backsplashes are an increasingly popular part of a kitchen meaning backsplash tile might be one key part of your kitchen makeover. Not only do backsplashes function to protect your wall from cooking stains, backsplash in your kitchen can really improve the look and style of your kitchen. If you're thinking about or working on a kitchen remodel, we've covered the basics in our guide on How to Remodel a Kitchen.
We reached out to a few bloggers who recently completed a backsplash kitchen makeover and installed new kitchen backsplash tiles. Let's see what they had to say about their experience from start to finish as they installed their kitchen backsplash tiles. P.S. If you need tips for how to plan a bathroom remodel, check out our guide. Or If you need assistance with your flooring project, learn about our Flooring & Tile Installation Services here.
How did you install the backsplash tile? DIY? Professional? Why did you choose this route?
Jeanette @ Snazzy Little Things
I installed the tile myself, and my main goal was an inexpensive DIY backsplash kitchen with an expensive-looking outcome. The total cost was under $200!The focus of this project was more about stenciling the kitchen backsplash tiles.
Rachel @ Craving Some Creativity
We installed the kitchen backsplash tile ourselves with a thinset mortar. The cost/benefit analysis was in our favor even though we had no previous tile experience. Therefore, we studied a plethora of YouTube videos and read articles. Overall, we didn’t find installing kitchen backsplash tiles in our new backsplash kitchen too challenging. Making sure the tiles were evenly flat against the wall was the biggest consideration.
Kaylor @ Brian & Kaylor
For the amount of work we did in this space, we were on a fairly tight budget so we DIYed the backsplash tile. The purchase of the tile was a splurge because I fell in love with some expensive tiles and couldn’t find another that compared. I decided it was worth the splurge to buy the kitchen backsplash tiles I loved. I was right. This was our first time tiling and it was surprisingly easy to install backsplash tile for kitchen. Messy, but easy. I prepped the space and did most of the tiling while my husband worked the saw and made cuts as I brought tiles to him. It was a great system for us, and we got our backsplash kitchen done over a weekend.
How did you choose your tile backsplash color/design?
It was a total whim. Before I installed the backsplash tile for kitchen, I thought I might be selling the house, and I wasn’t sure how long subway tile would be trending. Since I needed a backsplash quickly, I created mine in one weekend with a knock-down wall texture and a stencil. I studied the directions on the back of a can of pre-made wall-texture from a big-box home improvement store and figured it out. The backsplash turned into the focal point of my kitchen and I can’t imagine the space without it!
We went with a rather bold counter top choice in a light grey granite with black spots throughout and we already had cherry cabinets. I wanted a backsplash that was beautiful on its own but didn't compete with the rest of the higher contrasting elements. The tumbled marble tile provided the understated elegance we were looking for and we used white sanded grout.
We live on the coast in a waterfront home. The colors found at the beach and in coastal landscapes are present throughout our home and are the inspiration for the decor. I love the classic look of subway tile but I didn’t want to do the normal, white 3”x6” tile. The kitchen backsplash tile was a great opportunity to bring in some coastal color and character into the space. With vinyl wood flooring, wood countertops and soft white cabinets, things were going to be bland without a little pop. I decided to go with a larger, glass subway tile to get an updated, classic look. I fell in love with a 4”x12”, glass tile that is called natural white. It looks like the color of a glass coke bottle. A little hint of green but not too much. It is perfect in the space. I love how it changes color throughout the day depending on the lighting and how it feels coastal without being too beachy.
How often do you clean your backsplash tile? Daily? Weekly? What do you use to clean it?
By design, my backsplash completely hides dirt! But for the sake of this conversation…let’s just say "I clean it weekly." Just a simple wet cloth and dish soap is all it needs.
Unless I make a mess, I use a tile cleaner specifically for marble and I clean it about once a week. In addition, I reseal every six months.
I wipe the tile behind our sink daily. With butcher block countertops, you have to be careful about letting water and moisture sit too long. When I do the dishes or wash my hands, I usually do a quick wipe around the sink and the backsplash behind the sink gets a quick wipe too. The rest of the backsplash gets cleaned every few weeks with Windex or other good glass cleaner. It is glass tile and can be streaky if you don’t use the right cleaner. Windex leaves it clean and bright without streaks and even does a great job with the area around the stove which can be greasy.
Now that you have learned a bit about choosing, installing, and maintaining your backsplash tile, let's see how the experts approached the kitchen makeover from a broader perspective.
What did you enjoy most about the kitchen makeover as it was going on?
I dig fairly deep to find creative ways to make my projects look expensive on an extremely conservative budget. I don’t mind going off the grid and doing something unique. In the kitchen, I saved money in some aspects, which allowed me to splurge in others. Everything came together as planned and I was able to match my vision which came in under budget. I’ll admit, that doesn’t always happen. Anytime I save money on a project that turns out well, I get excited because I know I’ve economized and "paid it forward” in some way.
My husband and I are very team oriented when it comes to home projects. The most enjoyable aspect of our makeover was being able to work together on selecting the kitchen components and making choices as well as compromises. We had very different visions and it challenged us to incorporate both visions in an aesthetically appealing way.
For me, the part I enjoyed most was watching my vision come to life. This was our design, our color choices, our ideas for the space. Since we DIYed the entire project, I was a part of every step and saw the vision in my head become real one project at a time. It is such a satisfying feeling to see the transformation and say, "We did that." It was our hard work that created this beautiful space that we love so much.
What was most challenging about your kitchen makeover?
Since we paid everything out of pocket, we could only do what we could afford at certain times. This means we had to back-burner several projects until we could afford the time (or money) to fund it. Waiting was SO hard, but was a good exercise in patience.
Math error by husband...We ran into a rather stressful situation with our backsplash tile. He used an incorrect calculation for the backsplash and we realized this error after purchasing. Because we had chosen a very popular tile, the inventory was extremely low and the store searched all across the country to find us the remaining tile. If they couldn’t find it, we were literally going to wait until it arrived from Japan, by boat.
The most challenging and stressful part of the makeover was the butcher block countertop installation. We ordered two 12 foot long section and one 8 foot long section. They are extremely heavy, hard to maneuver, and a mess up meant having to wait a few more weeks for new ones to come in and spending more money, so there was definitely tension in the room when it came time to finally make the cuts. Plus we were at eight or nine weeks into the makeover by then and we were both exhausted and ready to be finished. Luckily, things went as planned and we got it right the first time.
What piece of advice would you give people starting a kitchen makeover?
Address functional issues first and foremost. In our case, we leveled our island and added butcher block. By doing so, we created a better work space and added seating options for our family. It was such huge relief to be able to maximize the use of this area. On the cabinetry — inspect the “bones” before you rip and replace them. I treated mine like I do any furniture makeover. Mine needed a good cleaning, some creative embellishments, and a coat of paint. This saved me a minimum of five-figures in home improvements! Some additional ideas for embellishing your cabinets include: adding trim, glass cabinet inserts, installing new hardware, corbels and leaded glass. In my case, I did it all. If you’re painting your cabinets, be sure to set up a dust free environment – you’ll want to paint in a sanitized location. I recommend spraying cabinets with two coats of an enamel paint. A top coat isn’t necessary when you choose the right paint. Not only does this save time, but it makes touching up so much simpler in the future. Water based enamels won’t yellow as quickly as oil based.
I would generally advise someone pick all of their finishes (tile, floor, cabinets, etc…) before they start, particularly if you are working with a spouse or someone else who has input in the design. Because we picked one element at a time, we realized that we had painted ourselves into a corner and later regretted the stone facing on the bar. While it's beautiful and we get many compliments, it doesn't fit with the rest of the kitchen design.
Purchase considerations for backsplash tile
When customers shop for backsplash tile, color (researched by 32% of customers) would likely play the most important role in their selection process. On top of that, it is also helpful to account for material and tile design. Finally, some shoppers narrow down the choices by shape, popular sizes, price, mosaic pattern, tile finish type, availability, and special offers. Positive reviews in the backsplash tile category bring up "great quality", "vibrant colors", "awesome price", "great look", "great shipping", "great pattern", and "great room".What's popular
- 18+ various color choices are regularly searched by our visitors, but most frequently visited ones are white (25% of customers), gray (18%), blue (11%), and beige (10%) backsplash tile. Also, copper and bronze color options have been gaining popularity in this category in the recent month.
- While upwards of 16 various material choices are regularly searched by our visitors, most frequently explored ones include ceramic (19% of customers), porcelain (19%), glass (16%), and natural stone (10%) backsplash tile.
- Upwards of 16 various tile design alternatives are regularly researched by our visitors, but most frequently searched ones include mosaic tile (18% of customers), subway (16%), patterned (12%), and spanish / moroccan (7%) .
- For shape, the most popular options are rectangular (42% of customers), hexagon (19%), square (19%), and arabesque (12%) backsplash tile.
- 23+ different popular sizes choices are routinely searched by our shoppers, but most visited alternatives are 3 x 6 (14% of customers), 4 x 4 (12%), 6 x 6 (10%), and 2 x 4 (9%) backsplash tile.